nanoFramework.Iot.Device.Bno055
1.2.217
Prefix Reserved
See the version list below for details.
dotnet add package nanoFramework.Iot.Device.Bno055 --version 1.2.217
NuGet\Install-Package nanoFramework.Iot.Device.Bno055 -Version 1.2.217
<PackageReference Include="nanoFramework.Iot.Device.Bno055" Version="1.2.217" />
paket add nanoFramework.Iot.Device.Bno055 --version 1.2.217
#r "nuget: nanoFramework.Iot.Device.Bno055, 1.2.217"
// Install nanoFramework.Iot.Device.Bno055 as a Cake Addin #addin nuget:?package=nanoFramework.Iot.Device.Bno055&version=1.2.217 // Install nanoFramework.Iot.Device.Bno055 as a Cake Tool #tool nuget:?package=nanoFramework.Iot.Device.Bno055&version=1.2.217
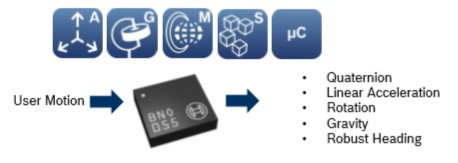
BNO055 - inertial measurement unit
Those sensors are intelligent 9-axis absolute orientation sensors. Most of the implementations are using I2C sensors but the sensor supports as well HID over I2C and serial port communication. This class only supports I2C.
All operations for a current usage has been developed. The individual interruption level settings for each sensor has not been implemented. If needed, they are quite straight forward to implement.
Documentation
BNO055 datasheet
You will find this device as "Inertial Measurement Unit" or "Adafruit BNO055 Absolute Orientation Sensor"
Usage
Important: make sure you properly setup the I2C pins especially for ESP32 before creating the I2cDevice, make sure you install the nanoFramework.Hardware.ESP32 nuget:
//////////////////////////////////////////////////////////////////////
// when connecting to an ESP32 device, need to configure the I2C GPIOs
// used for the bus
Configuration.SetPinFunction(21, DeviceFunction.I2C1_DATA);
Configuration.SetPinFunction(22, DeviceFunction.I2C1_CLOCK);
For other devices like STM32, please make sure you're using the preset pins for the I2C bus you want to use.
Create a Bno055Sensor class and pass the I2C device. The default I2C address is provided in the class.
I2cDevice i2cDevice = I2cDevice.Create(new I2cConnectionSettings(1, Bno055Sensor.DefaultI2cAddress));
Bno055Sensor bno055Sensor = new Bno055Sensor(i2cDevice);
Debug.WriteLine($"Id: {bno055Sensor.Info.ChipId}, AccId: {bno055Sensor.Info.AcceleratorId}, GyroId: {bno055Sensor.Info.GyroscopeId}, MagId: {bno055Sensor.Info.MagnetometerId}");
Debug.WriteLine($"Firmware version: {bno055Sensor.Info.FirmwareVersion}, Bootloader: {bno055Sensor.Info.BootloaderVersion}");
Debug.WriteLine($"Temperature source: {bno055Sensor.TemperatureSource}, Operation mode: {bno055Sensor.OperationMode}, Units: {bno055Sensor.Units}");
Debug.WriteLine($"Powermode: {bno055Sensor.PowerMode}");
You can easily access the sensor information and settings thru the properties.
Calibration
To get accurate measurement, it is better to wait for the Magnetometer to calibrate. As in your phone, when the calibration is needed, it is necessary to move the sensor in the air to help for the calibration.
The following code shows how to check the calibration:
Debug.WriteLine("Checking the magnetometer calibration, move the sensor up to the calibration will be complete if needed");
var calibrationStatus = bno055Sensor.GetCalibrationStatus();
while ((calibrationStatus & CalibrationStatus.MagnetometerSuccess) != (CalibrationStatus.MagnetometerSuccess))
{
    Debug.Write($".");
    calibrationStatus = bno055Sensor.GetCalibrationStatus();
    Thread.Sleep(200);
}

Debug.WriteLine();
Debug.WriteLine("Calibration completed");
Please note that it is not really necessary to check the calibration of the other sensors and the system. The qualibraiton is done all the time. The important one is the Magnetometer.
Accessing sensor data
Simply access the various sensor data thru their properties. Note that it is better to read at once the data and then display them, or manipulate them rather than accessing the sub element every time. The reason is because in the first case, you'll do 1 measurement and the data will be consistent, in the second case, you'll do 1 measurement every time you access 1 sub property which means, the data will be inconsistent.
Wrong way:
// Data will be inconsistent in this case!
// Do not access the data like this
Debug.WriteLine($"Magnetometer X: {bno055Sensor.Magnetometer.X} Y: {bno055Sensor.Magnetometer.Y} Z: {bno055Sensor.Magnetometer.Z}");
Good way:
// First read and store the data
var magneto = bno055Sensor.Magnetometer;
// Then manipulate the data
Debug.WriteLine($"Magnetometer X: {magneto.X} Y: {magneto.Y} Z: {magneto.Z}");
The sensor offers 9-axis measurement. Here is an example showing all the sensor properties you can access:
while(true)
{
    var magneto = bno055Sensor.Magnetometer;
    Debug.WriteLine($"Magnetometer X: {magneto.X} Y: {magneto.Y} Z: {magneto.Z}");
    var gyro = bno055Sensor.Gyroscope;
    Debug.WriteLine($"Gyroscope X: {gyro.X} Y: {gyro.Y} Z: {gyro.Z}");
    var accele = bno055Sensor.Accelerometer;
    Debug.WriteLine($"Acceleration X: {accele.X} Y: {accele.Y} Z: {accele.Z}");
    var orien = bno055Sensor.Orientation;
    Debug.WriteLine($"Orientation Heading: {orien.X} Roll: {orien.Y} Pitch: {orien.Z}");
    var line = bno055Sensor.LinearAcceleration;
    Debug.WriteLine($"Linear acceleration X: {line.X} Y: {line.Y} Z: {line.Z}");
    var gravity = bno055Sensor.Gravity;
    Debug.WriteLine($"Gravity X: {gravity.X} Y: {gravity.Y} Z: {gravity.Z}");
    var qua = bno055Sensor.Quaternion;
    Debug.WriteLine($"Quaternion X: {qua.X} Y: {qua.Y} Z: {qua.Z} W: {qua.W}");
    var temp = bno055Sensor.Temperature.Celsius;
    Debug.WriteLine($"Temperature: {temp} °C");
    Thread.Sleep(100);
}
Information regarding sensors and units
Orientation:
Absolute Orientation (Euler Vector, 100Hz)
Three axis orientation data based on a 360° sphere
Heading = Vector3.X; Roll = Vector3.Y; Pitch = Vector3.Z
Units availabel are Degrees (default) or Radians, you can change with
bno055Sensor.Units = bno055Sensor.Units | Units.EulerAnglesRadians;
Quaternion
- Absolute Orientation (Quaterion, 100Hz)
- Four point quaternion output for more accurate data manipulation
- Unit is 1 Quaternion = 2^14 returned data
Magnetometer
- Magnetic Field Strength Vector (20Hz)
- Three axis of magnetic field sensing in micro Tesla (uT)
Acceleration
- Acceleration Vector (100Hz)
- Three axis of acceleration (gravity + linear motion)
- Default unit in m/s^2, can be changed for mg
LinearAcceleration
- Linear Acceleration Vector (100Hz)
- Three axis of linear acceleration data (acceleration minus gravity)
- Default unit in m/s^2, can be changed for mg
Gravity
- Gravity Vector (100Hz)
- Three axis of gravitational acceleration (minus any movement)
- Default unit in m/s^2, can be changed for mg
Gyroscope
- Angular Velocity Vector (100Hz)
- Three axis of 'rotation speed'
- Default unit is Degree per second but can be changed to Radian per second
Temperature
Temperature (1Hz)
Ambient temperature in degrees celsius
Default can be changed for Farenheit
Temperature can be measured thru the Gyroscope or the Accelerometer
Precision seems better with the Gyroscope, so it is set by default. You can change the source like this:
bno055Sensor.TemperatureSource = TemperatureSource.Accelerometer;
Sensor data calibration
You can get and set the sensor data qualibration. Every sensor which permit the operation has a function to get the calibration data and set the calibration data.
This is an example of how to get and set the calibration data for the Accelerometer.
Vector4 calib = bno055Sensor.GetAccelerometerCalibrationData();
// Change, transform the calibration data
bno055Sensor.SetAccelerometerCalibrationData(calib);
Remapping the accelerometer axis
It is possible to remap the acceleroter axis as well as get their configuration.
For example, you can change the X axis for a negative signe likle this:
var axisMap = bno055Sensor.GetAxisMap();
axisMap[0].Sign = AxisSign.Negative;
bno055Sensor.SetAxisMap(axisMap[0], axisMap[1], axisMap[2]);
In the returned array, X is the first element, Y the second and Z the last one.
| Product | Versions Compatible and additional computed target framework versions. |
|---|---|
| .NET Framework | net is compatible. |
-
- nanoFramework.CoreLibrary (>= 1.14.2)
- nanoFramework.Runtime.Events (>= 1.11.6)
- nanoFramework.System.Buffers.Binary.BinaryPrimitives (>= 1.2.211)
- nanoFramework.System.Device.Gpio (>= 1.1.28)
- nanoFramework.System.Device.I2c (>= 1.1.9)
- nanoFramework.System.Device.Model (>= 1.2.216)
- nanoFramework.System.Math (>= 1.5.29)
- nanoFramework.System.Numerics (>= 1.2.211)
- UnitsNet.nanoFramework.Temperature (>= 5.0.0-rc009)
NuGet packages
This package is not used by any NuGet packages.
GitHub repositories
This package is not used by any popular GitHub repositories.
| Version | Downloads | Last updated |
|---|---|---|
| 1.2.639 | 77 | 9/6/2024 |
| 1.2.631 | 69 | 8/28/2024 |
| 1.2.613 | 86 | 8/9/2024 |
| 1.2.601 | 54 | 7/26/2024 |
| 1.2.590 | 78 | 7/17/2024 |
| 1.2.573 | 89 | 6/19/2024 |
| 1.2.570 | 84 | 6/14/2024 |
| 1.2.560 | 86 | 5/29/2024 |
| 1.2.548 | 95 | 5/15/2024 |
| 1.2.536 | 96 | 4/15/2024 |
| 1.2.514 | 106 | 3/22/2024 |
| 1.2.494 | 95 | 2/28/2024 |
| 1.2.474 | 112 | 1/24/2024 |
| 1.2.462 | 141 | 1/5/2024 |
| 1.2.458 | 129 | 12/20/2023 |
| 1.2.436 | 145 | 11/10/2023 |
| 1.2.416 | 92 | 11/8/2023 |
| 1.2.403 | 131 | 10/6/2023 |
| 1.2.396 | 103 | 9/27/2023 |
| 1.2.384 | 150 | 9/6/2023 |
| 1.2.378 | 142 | 8/16/2023 |
| 1.2.369 | 152 | 8/2/2023 |
| 1.2.363 | 132 | 7/28/2023 |
| 1.2.357 | 140 | 7/19/2023 |
| 1.2.354 | 128 | 7/14/2023 |
| 1.2.345 | 156 | 6/21/2023 |
| 1.2.341 | 144 | 6/14/2023 |
| 1.2.337 | 145 | 6/7/2023 |
| 1.2.335 | 146 | 6/2/2023 |
| 1.2.329 | 132 | 5/26/2023 |
| 1.2.313 | 137 | 5/12/2023 |
| 1.2.302 | 159 | 5/10/2023 |
| 1.2.297 | 145 | 5/3/2023 |
| 1.2.273 | 225 | 3/17/2023 |
| 1.2.267 | 238 | 3/10/2023 |
| 1.2.263 | 239 | 3/8/2023 |
| 1.2.259 | 218 | 2/27/2023 |
| 1.2.256 | 250 | 2/24/2023 |
| 1.2.253 | 236 | 2/22/2023 |
| 1.2.222 | 302 | 1/9/2023 |
| 1.2.217 | 328 | 1/6/2023 |
| 1.2.212 | 312 | 1/5/2023 |
| 1.2.208 | 299 | 1/3/2023 |
| 1.2.203 | 306 | 12/28/2022 |
| 1.2.159 | 385 | 11/14/2022 |
| 1.2.153 | 371 | 11/5/2022 |
| 1.2.141 | 393 | 10/25/2022 |
| 1.2.128 | 402 | 10/22/2022 |
| 1.2.122 | 449 | 10/12/2022 |
| 1.2.114 | 394 | 10/8/2022 |
| 1.2.95 | 444 | 9/22/2022 |
| 1.2.87 | 513 | 9/15/2022 |
| 1.2.73 | 409 | 9/8/2022 |
| 1.2.63 | 414 | 9/3/2022 |
| 1.2.47 | 434 | 8/15/2022 |
| 1.2.40 | 435 | 8/6/2022 |
| 1.2.38 | 437 | 8/5/2022 |
| 1.2.32 | 437 | 8/2/2022 |
| 1.2.28 | 454 | 8/1/2022 |
| 1.2.13 | 454 | 7/24/2022 |
| 1.2.10 | 431 | 7/23/2022 |
| 1.1.145.58726 | 461 | 7/7/2022 |
| 1.1.133.52556 | 452 | 6/30/2022 |
| 1.1.121.35854 | 470 | 6/26/2022 |
| 1.1.116.8772 | 446 | 6/24/2022 |
| 1.1.113.2032 | 448 | 6/23/2022 |
| 1.1.102.51394 | 418 | 6/15/2022 |
| 1.1.99.36719 | 441 | 6/14/2022 |
| 1.1.97.17326 | 442 | 6/13/2022 |
| 1.1.92.53000 | 436 | 6/8/2022 |
| 1.1.72.29765 | 427 | 5/31/2022 |
| 1.1.64.21380 | 450 | 5/26/2022 |
| 1.1.58.10097 | 458 | 5/23/2022 |
| 1.1.54.28879 | 457 | 5/23/2022 |
| 1.1.40 | 467 | 5/5/2022 |
| 1.1.3 | 480 | 4/15/2022 |
| 1.1.1 | 457 | 4/14/2022 |
| 1.0.300 | 470 | 3/31/2022 |
| 1.0.288-preview.114 | 120 | 3/25/2022 |
| 1.0.288-preview.113 | 117 | 3/25/2022 |
| 1.0.288-preview.106 | 111 | 3/23/2022 |
| 1.0.288-preview.104 | 106 | 3/22/2022 |
| 1.0.288-preview.103 | 106 | 3/21/2022 |
| 1.0.288-preview.100 | 116 | 3/19/2022 |
| 1.0.288-preview.99 | 123 | 3/18/2022 |
| 1.0.288-preview.98 | 114 | 3/18/2022 |
| 1.0.288-preview.95 | 125 | 3/15/2022 |
| 1.0.288-preview.93 | 112 | 3/15/2022 |
| 1.0.288-preview.87 | 113 | 3/10/2022 |
| 1.0.288-preview.86 | 116 | 3/8/2022 |
| 1.0.288-preview.77 | 118 | 2/27/2022 |
| 1.0.288-preview.75 | 107 | 2/26/2022 |
| 1.0.288-preview.65 | 110 | 2/18/2022 |
| 1.0.288-preview.63 | 112 | 2/16/2022 |
| 1.0.288-preview.61 | 118 | 2/12/2022 |
| 1.0.288-preview.58 | 108 | 2/10/2022 |
| 1.0.288-preview.53 | 111 | 2/9/2022 |
| 1.0.288-preview.48 | 128 | 2/4/2022 |
| 1.0.288-preview.41 | 123 | 1/31/2022 |
| 1.0.288-preview.29 | 123 | 1/28/2022 |
| 1.0.288-preview.20 | 127 | 1/27/2022 |
| 1.0.288-preview.19 | 117 | 1/27/2022 |
| 1.0.288-preview.18 | 126 | 1/27/2022 |
| 1.0.288-preview.5 | 122 | 1/24/2022 |
| 1.0.288-preview.3 | 119 | 1/21/2022 |
| 1.0.288-preview.1 | 117 | 1/21/2022 |
| 1.0.272 | 154 | 1/10/2022 |
| 1.0.259 | 332 | 12/9/2021 |
| 1.0.258 | 336 | 12/7/2021 |
| 1.0.218 | 189 | 10/18/2021 |
| 1.0.157 | 349 | 9/4/2021 |
| 1.0.155 | 333 | 8/31/2021 |
| 1.0.153 | 344 | 8/14/2021 |
| 1.0.151 | 343 | 8/6/2021 |
| 1.0.146 | 339 | 7/22/2021 |
| 1.0.130 | 149 | 7/6/2021 |
| 1.0.127 | 173 | 7/5/2021 |
| 1.0.125 | 188 | 7/5/2021 |
| 1.0.12 | 186 | 5/21/2021 |